TBB (marquee)

Gadget Reviews, tricks and tips, Html coding, unboxing, editing and much more. Follow/Like/Subscribe TechnoBoomBox on Facebook,Twitter,Tumblr ,YouTube and Instagram.

How to add emoticon keyboard on iOS

Add different language keyboards and emoticon keyboard. 

Step 1 
Go to settings and then open General. 


Step 2 
After opening General menu scroll down to keyboard. 


Step 3 
Open keyboard and then select keyboards.


Step 4 
 Select add keyboard from the options. 


Step 5 
Select the keyboard you want and click on it and it will be added. To add the emoticon keyboard select Emoji from the options. 


Now let's check it. 
Click on the round circle type icon on the left bottom of the keyboard and there you have it. Tap and hold that icon for multiple keyboards to choose from. 


How to add back to top button on a blog

Learn From the video.

Here for the code? 
Code for back to top button:

Step 1
Go to your blog dashboard and go to template and then click edit template.

Step 2

Find  ]]></b:skin> tag in the code. 
Copy and paste the code below above/before ]]></b:skin> tag as told in the video.
}
#technoboomboxbtt{
padding:5px;
position:fixed;
bottom: 5px;
right: 5px;
cursor:pointer;
}

Step 3

Find </head> tag in the code.
Copy and paste the code below just above </head> tag as mentioned in the video.

<!-- Back to top button by PS -->
&lt;script src='http://ajax.googleapis.com/ajax/libs/jquery/1.10.0/jquery.min.js'
type='textjavascript'&gt;&lt;/script&gt;
&lt;script language=&quot;javascript&quot;&gt;
$(window).ready(function(){
$('#technoboomboxbtt').click(function(e){
e.preventDefault();
$('html, body').animate({scrollTop:0}, 'slow');
});
});
&lt;/script&gt;
<!-- Code by Techno BoomBox Blog -->

~For the image url do as told in the video.~

Step 4

Find </body> in the template code.
Copy and paste the code below before/above the </body> tag.

<a href="#" id="technoboomboxbtt">
<img src="Image URL" alt="Back To Top" title="Back To Top" /></a>
Replace the text in blue with the URL of the Image.

Tip-
If you want the same image I used do the following except of step 4
Copy and paste the code below before/above the </body> tag.

<a href="#" id="technoboomboxbtt"><img src="https://blogger.googleusercontent.com/img/b/R29vZ2xl/AVvXsEj83YYJpzh-LDTUTu-QnVUek39k1ep-IXgGSpbDU0Mj7ZzRL2Wb5UoqdQWwyc98SG3n-oOBRYbISEN0x44WLQ_0Q8p0XBbkg1BbnQ-dVcXOvfKLG7UnnjKyG1UJLan6n2nzGfa1rXfuOlc/s48/Metro-Back-Black-48%2520right.png" alt="Back To Top" title="Back To Top" /></a>
Step 5 
Save the template.
And you'are done! 


Got a Question? 
Leave a comment below or on Ask a Question
Techno BoomBox 

How to add social networking buttons to blogger sidebar

How to add social media buttons to blogger sidebar.
Simple,quick and easy.

Please check out my blog guys..
Blog: www.technoboombox.blogspot.com
Icon archive: www.iconarchive.com

Watch my YouTube video (below) and quickly learn to add social media buttons to blogger sidebar like the one on this blog.


Got a Question? 
Leave a comment below or on Ask a Question. 
Techno BoomBox 

Garage Band Free on App store

This is only for a LIMITED period.

Guys grab your iPhone asap and download Garage band application! 

It is FREE for now! 


Techno Boombox on Tumblr

Memes, quotes and much more.. 
Follow Techno Boombox on Tumblr for your daily dose of fun!

Tumblr- TechnoBoomBox


Got a Question? 
Leave a comment below or on Ask a Question. 
Techno BoomBox 

Techno BoomBox on Instagram

Memes, quotes and much more.. 
Follow Techno Boombox on Instagram for your daily dose of fun! 

Instagram- Technoboombox


Got a Question? 
Leave a comment below or on Ask a Question. 
Techno BoomBox 

400,000+ YouTube views! Wohoo!

Thank you so much for your support everyone. TechnoBoomBox has hit 400,000 views on youtube. 

If you haven't visited the TBB YouTube channel click the link below
www.youtube.com/drake251195


Please help us grow by sharing this Blog and YouTube channel on facebook, twitter or any where else 

You can also like TBB facebook page or follow TBB on twitter. Thanks :) 

TecnoBoomBox (TBB) 

Update to ios 7 using iPhone

Want to update to iOS 7?
Now you don't need to connect with your computer to do so. 
Follow these simple steps below:

Step 1: 

Go to Settings and select General. 


Step 2: 

After you select General select the second option that says Software Update.


Step 3: 

After you have selected the option you will see this (pic below). It has few lines describing the new update and there is a option learn more which gives further details about the update. 
To update click Download and Instal. 

 
There you go. Easy,fast and simple. 

Got a Question? 
Leave a comment below or on Ask a Question. 

Techno BoomBox 

How to download music on iPhone for free

Want to download music on your iPhone or any iOS device?
Follow these simple steps and download the music of your choice for free 

Step 1:

Download Google chrome and Free music download- mp3 downloader from the app store on your iOS device. Both these apps are free. 


Step 2: 

Open google chrome and go to youtube.com and then hit the icon next to the address bar which has three horizontal lines. Scroll down to "request Desktop site" and select that. 
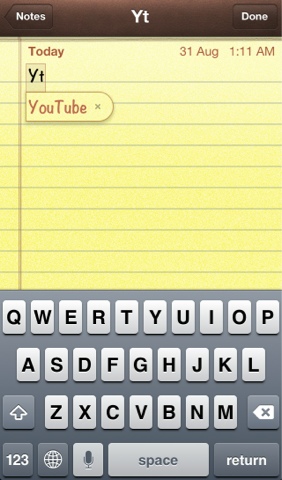


Step 3: 

Type the name of your desired song in the youtube search bar and then open it.  


Step 4:

After opening the desired video. Click on the address bar and copy the url of that video. 


Step 5: 

After copying the url. Open Free music download- mp3 downloader app and click the icon on extreme right bottom which says browser. And go to youtube-mp3.org. 


Step 6: 

Paste the url you have copied from the youtube 
video into the bar above download. And hit 
Convert video. 


Step 7: 

After converting the video click the download 
button and it will bring up few options. Hit 
the download button.


Step 8: 

After clinking the download button it will bring 
you to this page below. Click the button saying
Save on the top right corner.


After which your song will be downloaded.
Click the button which is in the bottom middle 
saying files. 


You will have your downloaded song in the list
(The song downloaded was M83 in this 
case). Select a song and it will start playing. 


Got a Question? 
Leave a comment below or on Ask a Question.

Techno Boombox 

How to rest your iPhone

This how you rest your iPhone,iPod or iPad. 

Step 1: 

Go to settings and select general from the list. 


Step 2:

After selecting it. Scroll down to the bottom of the page. And click on reset. 


Step 3:

After selecting rest from the menu.There are various option in reset itself like reset to all settings,etc. Choose the desired one. 


Your iOS device will be reset according to the option you have selected. If you have set a passcode on your iOS device then just enter your passcode and you are good to go. 

Got a Question? 
Leave a comment below or on Ask a Question. 

 Techno Boombox 

Changing the font of notes on iOS

Want to change the font of notes?  
Here is how you do it 

Step 1

Go to settings, scroll down to notes option and click it. 


Step 2

Next step is to select the font you want. iOS only provides with 3 choices of fonts. Select the one you want to use.


After selecting the desired font go to notes and the font on notes has been changed.


Got a Question? 
Leave a comment below or on Ask a Question. 

 Techno Boombox 


How to set keyboard shortcuts on iPhone

Typing on iPhone or iPods is really difficult and uneasy. Well here is a feature called shortcuts which makes typing easier and faster.

Step 1:
Go to Settings and then select General from the menu.


Step 2:
On the General menu scroll down to the bottom of the page and select keyboards. 

 
Step 3:
There are couple of options in the keyboard menu, scroll down to shortcuts and select it. 


Step 4:
In the shortcut menu you can either edit existing shortcuts by clicking "edit" in the bottom left corner or add a new shortcut by clicking the "+" icon on the top right corner. Let's make a new shortcut by clicking the plus button.
Type in the phrase and it's respective shortcut. 


Now if you type in the shortcut in any text box and hit space it will convert it to the respective phrase. 


There you go. 

Got a Question?
Leave a comment below or on Ask a Question. 
Techno Boombox


How to make a Blog on blogger.com

Make a blog in 2 minutes by following the 5 steps below:

Step 1: 

Go to Blogger.com and click the sign up button on the top right corner or click here to Sign up.

Click on the image to enlarge the image.

Step 2:

You will get to this page by following step 1 after which you have to fill in your details and hit next.


Click on the image to enlarge the image.

You will see this page below after you have finished signing up.

Click on the image to enlarge the image.

Step 3: 

Hit the button create blog on the left side of the screen.

Click on the image to enlarge the image.

Step 4:

Type in the desired title of your blog and the the blog URL. URL is the address of a file on the Web, such as www.sampletechno.blogspot.com.


Click on the image to enlarge the image.

Step 5:

Congrats! You have a new blog. So,starting blogging..


Click on the image to enlarge the image.


Got a Question?
Leave a comment below or on Ask a Question
Techno Boombox

10,000+ Page views

10,000+ Page views

Thank you everyone for your constant support!
We have hit 10,000 page view mark!
Please help this blog grow even more by sharing on Twitter,Facebook or any other site. :D


Drum Kit

DrumKit - the best drumming experience on Android
DrumKit is a multitouch drumming application which provides the best experience of finger drumming.

DrumKit is a free customizable virtual drum set for Android. It gives you the best drumming experience on your phone.
It comes with many different drum components which can be arranged as you wish - you can move elements across the screen, you can adjust their volume and you can remove or add them on the screen.
All this comes with animations - you can enable animations and have a great time. DrumKit also gives you the opportunity to record a beat loop. Beat loop then plays so you can enrich your music with some additional drum moves.

WhatsApp (The Best Free Messenger)


WhatsApp Messenger is a cross-platform mobile messaging app which allow to exchange messages free off cost. About 100,000,000 people have download this App from the play store alone. It is one of the top free apps of all time.It is easy to use and simple to install.You do you have to register with WhatsApp when you download it.You just have to give your Number and there you go all set up.No need to enter names,info and make an ID.Your phone number is the ID.Plus you do not need to Add your friends on WhatsApp messenger.It scans all your contacts and automatically add your friends and family who are already using the app.It is available on Android, iPhone,BlackBerry, Windows Phone and Nokia.

It has Many more features.They are listed Below:

Free Of Cost: Once you and your friends have download the application. You can chat as much as you want.WhatsApp only uses the Internet connection Like 3G/Edge or Wi-Fi.

Multimedia: Send videos,Images and voice notes to you friends.Free of cost.

No pins and Usernames: WhatsApp works with your phone number. Just enter your phone number at the time of installation and you are set.No need to remember pins and username anymore.


No Need To Add Contacts: The address book in your phone is used to automatically connect with the contacts.The contacts which already have WhatsApp Messenger will be added to your WhatsApp contact list and you can start chatting with them.

Group Chat: You can add your contacts in a group and discuss about a topic or chat with multiple people at a time in a group.

Status and Profile Picture: You can set status and can add your picture to the profile.

International Messages: There is no extra cost for sending messages across the seas.You can send unlimited messages to your friends all over the world.

And More:You can share your location with your friends,you can change and set custom notification sounds and wallpapers,broadcast messages and MMS to many contacts at once.

Emoticons:The Best part is it has Emoticons and lots of them.Emoticons are basically like smileys and all.

Final Verdict

The app is just absolutely amazing.It is available on Android, iPhone,BlackBerry, Windows Phone and Nokia.With such amazing features and plus it is all free it is a must get for everyone.It replaces the use of SMS.Final word,if you do not have this app get it Right Now and If you do have the app then you are Awesome!!

Avast! Mobile Security Application (App)


Avast

Avast is a mobile security app which protects the phone form virus and malicious data.It not only scans apps and the rest of the data on phone but also the web pages.It can block or remove any malicious data that could harm the device.It is one of the best antivirus app for mobile and it is Free.It has features like Call filter,automatic scan and Network meter.

Main Features 

Some of the main features of the applications are listed below:

Antivirus: It scans installed apps and memory card content on demand and new apps upon first use.It is one of the best antivirus apps for mobiles.

Privacy Report: Scans and displays access rights and intents of installed apps.

Anti-Theft: Gives you remote control via SMS or web.It tracks the mobile phone,activate a siren and can wipe the memory is your phone is lost or stolen.

Network meter: It measures the data used or sent.

Web Shield: Scans each URL that loads and warns you if it's malware-infected. Includes USSD blocker.

Widget: It also has a widget which one can add to the home screen and use it directly from the home screen.

App manager: Lists apps and their sizes,CPU load,Memory used,etc

SMS/Call Filter: It blocks/filters the selected contacts.

These are some of the main features of the avast mobile security app.It is easy to use.It protects the phone and helps to find it if lost or stolen.It is also a call and sms blocker.And it is FREE.This app is must for all mobile devices.Check out the video below.


Wave Launcher For Android


A quick gesture-enabled quick launch bar always accessible with a simple gesture
Wave Launcher is the ultimate add-on launcher available for Android! With a single swipe you can launch up to 120 of your favorite apps, shortcuts and recently-used apps regardless of which app is currently running. Wave Launcher is accessible anytime, anywhere!

Few features:

  •  The wave can contain any application or shortcut you can add to your home screen.
  • The wave can contain a direct-access icon to the built-in app-drawer.
  •  The wave can contain dynamically updating recently-used apps.
  •  'Recents Mode' will show you 12 recently used-apps
  •  Manual exclude list for recents.
  •  Create folders on the wave. Folders are fully controllable with swiping alone.
  • Customizable wave colors and icon size
  • The wave is accessible anytime, regardless of which application is currently running, using a simple gesture!
  •  Supports custom icons from ADW themes (More coming soon!).
  • Use any picture/icon from your gallery/SD-card as icon.
  • The wave responds to your finger movement. It changes its shape, icon size, and icon transparency.
  • Can be enabled by swiping from the bottom, left side or right side of the screen (See the 'calibrate' screen)

Few more:

  • Fully independent, doesn't need to replace your home-screen app.
  • Doesn't interfere with running applications.
  •  Small memory footprint.
  •  Fully customizable gesture-area with a single long-press and swipe!
  • Doesn't affect battery-life!
  • Tons of customization settings!
  • Plugins infrastructure.
  • App-drawer plugin with single-tap and long-press functionality.
  •  Controllable notification action.
  •  Localized to 9 languages:
  • App-drawer plugin features:
  •  Cool animations.
  •  Sort alphabetically.
  •  Sort by last-update-time.
  •  Sort in ascending/descending order.
  •  Unlike standard home-app, icons are kept in volatile cache and memory is freed when asked by Android.
  • Long-press apps to show on market, and uninstall.
Check out the video for more details:


Back To Top